lellow jello

26 June 2012

miso happy

this past weekend, my sister-in-law was getting ready to go to the mainland to attend a conference. the night before she left, she was craving ramen. she wanted some asian flavor before spending a week in the midwest. instead of spending $50 to get takeout and bringing home a bunch of styrofoam containers that would end up in some landfill, i offered to make some miso ramen. i love miso ramen. it has so much more flavor than shoyu ramen. and it's amazingly easy to make at home!


a couple months ago, i tried this miso ramen recipe that i found through foodily.com. the original recipe called for vegetable or pork broth. so for my first go, i tried it with the vegetable broth. but the mister requested a different broth this time, so i went ahead and experimented with beef broth. (it got a big thumbs up from the mister). another little difference: the original recipe called for dried noodles, but i ended up using fresh ramen and udon noodles, because i just couldn't find any dried noodles that weren't instant ramen. the possibilities of toppings are endless. our dinner is just what i happened to have in the pantry / freezer. 

miso ramen

  • 4 servings of fresh ramen (or udon)
  • 1 cup frozen corn (defrosted)
  • 8 cups beef broth
  • 2 tsps instant dashi granules
  • 1 tbs soy sauce
  • 4 tbs fresh miso paste
    6 pcs nori, cut into small strips
  • 1 stalk green onion, finely chopped


    divide the noodles, corn, nori, and green onion (or your other desired toppings) among 4 large serving bowls.

    in a medium pot, combine the beef broth, instant dashi and soy sauce. bring to a boil over high heat. remove from the heat and stir in the miso. ladle soup into each bowl and serve immediately.

Labels:

20 June 2012

adidab: all day i dream about bread

before we had a baby, we had bread-day mondays. i went through this period where i made bread almost every monday, because it was my day off, and it seemed like the right thing to do. when i started making no-knead bread, there was a little more planning involved because bread-day mondays needed to start on sunday. i don't remember exactly when it stopped, but i know when i got pregnant, i didn't feel like doing a whole lot. and then when we had the baby, i just didn't have time to do a whole lot. now that the little man is, well, a little man, i think we need to reinstate our bread-day. except my day off is now wednesday. but i think i'll be able to adjust. 


to kick it off, i made roasted garlic and cheese pot bread. and it was delicious. amazingly crunchy and chewy crust. it made me remember why i used to do this every week. and it made me want to do it more than once a week now. the recipe was adapted from baggett's kneadlessly simple book.


Roasted Garlic and Cheese Pot Bread
1 large head garlic
1 tbs EVOO
1/4 c + cheese (i used an italian mix)
4 c AP or bread flour (i used half and half)
2 tsp salt
1 1/4 tsp instant yeast
2 c ice water


cut the top off and roast the garlic with the EVOO in a small bowl covered with foil (at 350 degrees for 45 minutes). let cool, then squeeze the cloves out of the paper and mash together with the cheese to make a paste.


mix together the flour, salt, and yeast, then add in the water and garlic paste and mix until blended. add more flour as needed to keep the dough stiff. it will still be sticky, which seems wrong, but don't worry...it'll all work out in the end. spray dough with EVOO and cover with plastic wrap. (if you have time, refrigerate for 3-10 hours) let rise at room temp for 12-18 hours. 


with an oiled spatula, lift and fold the dough into the center without over-deflating. spray with EVOO and cover to let rise for another 2 hours. 


preheat the oven to 450, and oil the inside of a 4 quart dutch oven (i used the oil that i roasted the garlic in...garlicky oil...mmm). preheat the dutch oven, then loosen the dough from the bowl with a greased spatula, and drop into the dutch oven. brush the top of the dough with water, and sprinkle on a little more cheese. reduce the heat to 425, and bake covered on the lower rack for 45-50 minutes. if golden brown, bake covered for another 10 minutes until a skewer comes out pretty clean. if not golden brown, bake uncovered for another 20 minutes. cool in the pot for 10 minutes, then remove and cool on a cooling rack. 

Labels: , ,

16 June 2012

Poi in fried form

Tonight we had Hawaiian food for an early father's day dinner. They were going to buy kalua pig, but i thought, "hey, I can make that in my slow cooker!" At the semi-last minute, I decided I also wanted to bring poi balls. 
Poi balls are awesome. They're not too sweet, and they're crunchy on the outside, but chewy on the inside. They were a big hit. More than half of them were gone before dinner even started. some were eaten with dinner. And more were eaten after dinner. They are best if you eat them within a few hours of making them, but if you can't finish them all in one sitting, you can re-crunchify them by throwing them in the toaster oven for a little while. 


Poi Balls
(makes ~55 balls)
vegetable oil
1 lb bag poi
1 can coconut milk
1 box mochiko
1 cup sugar

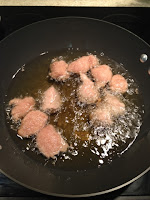
Heat oil in a wok or heavy pot (enough to deep fry). With an electric mixer, mix together all ingredients until blended and smooth. 


Using a small ice cream scooper, drop little balls (~1.5 inches in size) of the poi mixture into the oil and fry in batches until golden brown. Allow to cool on a wire rack (over a baking sheet to catch the oil drips).


Labels: